Work started mid-June....late, due to preparation for arrival of our visitors to Alaska & the activities while they were here.
I started with the bedroom to get it ready for a guest that would be coming to Alaska for her first visit here. In the event that we might use the cabin while she was here, I wanted it to looked "civilized" enough for her to enjoy her experience!
The work began the weekend of June 19-21, I cleared out ALL of the items I had been storing in the bedroom since 2005...and got started!
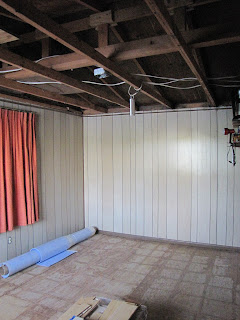
First came new flooring, the laying of the underlayment & then the new vinyl strip flooring. Unfortunately, I ran out of materials so finishing would have to wait until the next weekend!

Back in Anchorage, I checked with various hardware & flooring stores, but I couldn't find the same underlayment. The next weekend, I headed back out with the remaining boxes of vinyl needed to finish the job! Since I had pieces left of the underlayment (the blue layer in the picture), I figured I'd have to "piece" as much of it as possible and hope that there was enough to cover the remaining bare plywood floor. Fortunately, there was and it actually looked rather "artistic", at least from a mathematicians viewpoint! (see picture below)

The finished project didn't look too bad either....even if the mathematician isn't the greatest photographer!....:)

So now that the the floor was completed, it was time to start working on the ceiling.

Oh, I forgot to mention, along with the additional vinyl strips, I purchased some tongue-n-groove pine for the ceiling. So once I got started......

...the installation went fairly quickly.
 3rd Working Weekend!
Back in Anchorage the next week, a platform bed I ordered was delivered. I went shopping for a mattress and bedding before heading back out for the 4th of July weekend. My brother, Butch & his friend, Monte, transported the mattress for me & even carried it down the "killer" hill! Mom & Dad came out for a day to help me put the bed together and even brought a nice picnic lunch for us! I enjoyed their company so much that I sure wish they could come out more...and I also wish it were easier for them to get to the cabin.
At this point, the bedroom was getting closer to being useable so I left it at this point with the intent to bring the blankets if we had the time to stay!


Fast forward to August....a few more improvements for the bedroom. A new comforter & quilt, a padded headboard for comfortable reading in bed before the lights go out and.....the last item, which you can't see in the pic below except for part of the leg (in the lower right side)....was a "bedside commode" complete with chair stand! Yeah.....no more running to the outhouse in the middle of the night!! My friend would have loved it....unfortunately, we didn't have enough time to stay at the cabin on her trip this year!

Now, the real fun starts...in the main room! The picture below is how I left the cabin at the end of 2009 summer. Everything you see in the picture is GONE!....except for the walls, the flooring & the chandelier. I sold the cabinets, gave the table & chairs to my brother, Bill, who's building a log cabin over 200 miles northeast of Anchorage and the black item on the far right and the stove next to it, were moved to the smaller cabin.

Compliments of Mom & Dad, an electric fireplace was added and thanks to my brother, Butch & his friend, Monte for transporting it out for me! The fireplace was a perfect place for the flat screen TV.....and no!...I don't have TV reception, but this TV has a built-in DVD player, so I watch TV without commercial interruptions and the programs are on MY schedule....lol...when I could no longer work outside due to lack of daylight! I purchased the entire season(s) of my favorite TV programs! Can you see me enjoying my first time watching TV at the cabin?..:)

Here's another view before the desk was placed in the corner where the recliner is in this picture! By the way, the vertical blinds were recycled...they came out of my home when I started the remodeling! Have to recycle some things!!....lol

The next item added to the cabin was a craigslist item.....a corner cabinet. The problem was, how does one person get it from the truck in the driveway, down the hill and into the cabin! I was the only one there, so I left it in the truck overnight to "think about it". In the morning, I did all sorts of "other" tasks while continuing to think about it.....& hoping "someone will show up"! I finally decided it wasn't going to get into the cabin unless I at least tried! I went to get the truck dolly.....but once the cabinet was on the dolly, I soon realized that this wasn't going to work. The ground was pretty rough so every bump I rolled the dolly over, caused the top heavy cabinet to swing from one side to the other.
Surveying the situation, I looked at the cabinet, then the dolly, then the truck and then the steep hill that the cabinet would have to go down.....then I surveyed my options again & maybe even a few more times until I realized that my answer was right there in front of me....the cardboard! It was going to be the only way I could get it down the hill safely...for me as well as the cabinet. How you ask.....take a look at the picture below and I think you'll see what I ended up doing!
.jpg)
I always carry cardboard in the back of my truck....things slide in & out easier! I had more than normal this summer because I saved most of the packing material that was used to ship my kitchen island for the cabin. So with the three pieces I had, I simply shifted one piece after another, taking the back piece and moving it from the uphill to the downhill side of the cabinet then slide the cabinet down the hill and do it all over again until it was at the bottom of the hill!
.jpg)
Once down the hill I could use the dolly to move it over & into the cabin! Luckily, as you might be able to tell, the cabinet was made from pine.....its a very light weight wood. I was also lucky that moving it the way I did, I didn't put any nicks or scratches in it, as pine is also a soft wood!
.jpg)
End of August, now on to September! I had been saving a desk in town that I intended to move to the cabin. In order for me to get it from Anchorage to the cabin, it had to be taken apart so I could handle the move on my own. The desk weighs about 300 to 400 lbs when assembled. Once taken apart, loaded, transported and carried down the hill into the cabin, the "project of patience" commenced! It took me two days.....at different times, to put it together! It wasn't difficult to know how the pieces went together, but fitting them was the problem! Patience was definitely the name of the game.....thus two days of trying now, then trying again later!

Finally together, this is what it looked like! A perfect fit for where I wanted to place it!....right in front of one of the windows that look out over the lake!

The last item to be added to the inside of the cabin for this summer was the kitchen island that I had purchased in southern France! I had made up my mind during the winter months, that the cabinets I had been putting together, were NOT going in the cabin! I was not satisfied with the quality.....and also feeling like, they were not going to be worth all the effort & money to get them installed! The cabinets sold after only a few days on craigslist and the couple that bought them were going to be installing them in their cabin themselves. The big difference between my cabin or their cabin was the husband was a carpenter!....he'd know what to do to make them work for them!
Back to my kitchen island, for now it is just sitting up against the wall that was meant for the kitchen. I'm not sure yet if I'll move it or leave it.....however, I do know that I'll be putting doors on it! Why you ask?....I have a cat, Loa.....can you imagine how much fun she'll have if she can hide in all the appliances or whatever else I store in the kitchen island? She's already gotten herself stuck under the kitchen island!....don't know how she can flatten her head enough to get under!


Several weekends later, I discovered a brand new old-style water pump in the smaller cabin that I forgot I had! It fit perfectly in the one plumbing hole of the kitchen island! Not sure it's going to stay though as it's hard to wash my face over the sink without bumping my head on the pumps spout! The black box on the right side of the island is the microwave that Mom & Dad gave me about 3 years ago for the cabin!....and it's a good one too....it can pop popcorn in it without burning it!! Next summer the microwave will be sitting on top of the counter height refrigerator so I have more counter space!

The cabin is becoming more modern each year! Next summer it'll be time to start thinking about running water!!
Time to move to the outside!
You might recall that last year I was wanting to clear part of the wooded area where the trees were dying due to standing water! The picture below is the section of the woods at the top of the hill that I wanted cleared. The picture was taken in early May...thus the reason for the barren appearance of the woods! It also doesn't show you where on my property this "clump" is located, but maybe the pics after it will make it alittle easier to see....

August 21st was the date set up for that part of the "jungle" to be "buried"! This contractor is my favorite.....he does what he says he's going to do and is on time!

The area that I wanted cleared in the first picture is the area just above the cab of the truck in the picture below!

The picture below shows the same area and almost ready for the fill to be trucked in!

The fill was brought in during the week, so I wasn't there to take any pictures of the process, but here are the pictures that count....the final result! I was told by neighbors that four dump trucks were running all day with fill!


.jpg)
Notice the light in the window near the left side of the picture below....that's my cabin!
.jpg)
Next project...the outhouse!
I think every outhouse built in this area was painted with this bright yellow paint. Even one of my neighbor's has a yellow outhouse! But as you can see, the bright yellow paint is chipping and I want a different look!

I started by installing some astro-turf carpeting on the seat (minus the hole, of course) and put the old toilet seat & cover back on for now....it's padded so when you sit on it when it's cold, it takes, literally, only a second or two and your body heat has it warm!

Next it was time to install the new wall surface! I decided to use some hardwood flooring that was given to me by a contractor.

After I found out how much this flooring cost, I decided to cover as many walls as I could with the material I had & do something different with the remaining walls! It covered two walls minus the last (top) row on the side wall! It's hard to see in this picture, but the top row on the left side is unfinished!
This is where I left the inside of the outhouse until next summer. The "de-fragrancing" will come next year with some enzymes that will take care of any unpleasant odors and then some lime! In this picture the roof is finished also, but the story of the roof comes next!
 On to the roof of the outhouse / shed......
As I was "sliding" the cabinet down the hill a few weeks earlier, I noticed that leaves had accumulated on the roof of the outhouse/shed & would have to be cleaned off.

Once cleaned off, I saw what I didn't want to see!
.jpg)
Rotted plywood under the roofing material, so the only to do was....
add another project to get done before the end of summer!
.jpg)
So the third weekend in September, the project was started. First, the old roof had to be removed, next, remove & replace rotted top ridge boards, then install additional support boards missing in the original construction & finally.....
.jpg) Install the new roof....YEAH!!
Install the new roof....YEAH!! .jpg)
With this new clear roof, there's no need for lights inside now...even at dusk, there's more light inside then on the brightest day before the new "look"!....the outhouse below.
.JPG)
The storage/tool shed looks like it has fluorescent lights now!
.jpg)
What use to be the dark dungeon for a tool shed....is no more!!
.JPG)
The very last project for this summer didn't get completed...placing a surface on the pathway down to the shoreline. The contractor's opinion was that the slope of the pathway was too steep for a four wheeler to go up and down safely. Also, after a pretty hard rain fell in August, it was obvious "something" had to be constructed that would not let the soil erode!
After thinking about alternatives, I decided to have some type of steps constructed...natural steps! So the project I have before snow falls, is to find a "landscaper" type contractor that will start the project as soon as the snow is gone and the soil thaws in the spring!

Hopefully, next year, access to the cabin should be easier!
Once again, as each summer ends & it's time to close the cabins,
I reflect on the reasons that drive me to work so hard here!

It isn't hard to see why....the peacefulness and the beauty!
With fall here once again, nature readys the land for it's winter sleep...
and yields yet another one of it's seasonal beauties.

I will miss it....and also, one of my buddies at the lake....Mia, my neighbor's dog! Mia, like many dogs, is a very special buddy & I treasure her company!

So till next summer....goodbye summer, hello winter...and spring, watch out!


.jpg)
.jpg)
